2014年12月15日

clonezilla live大硬碟映像檔還原小硬碟

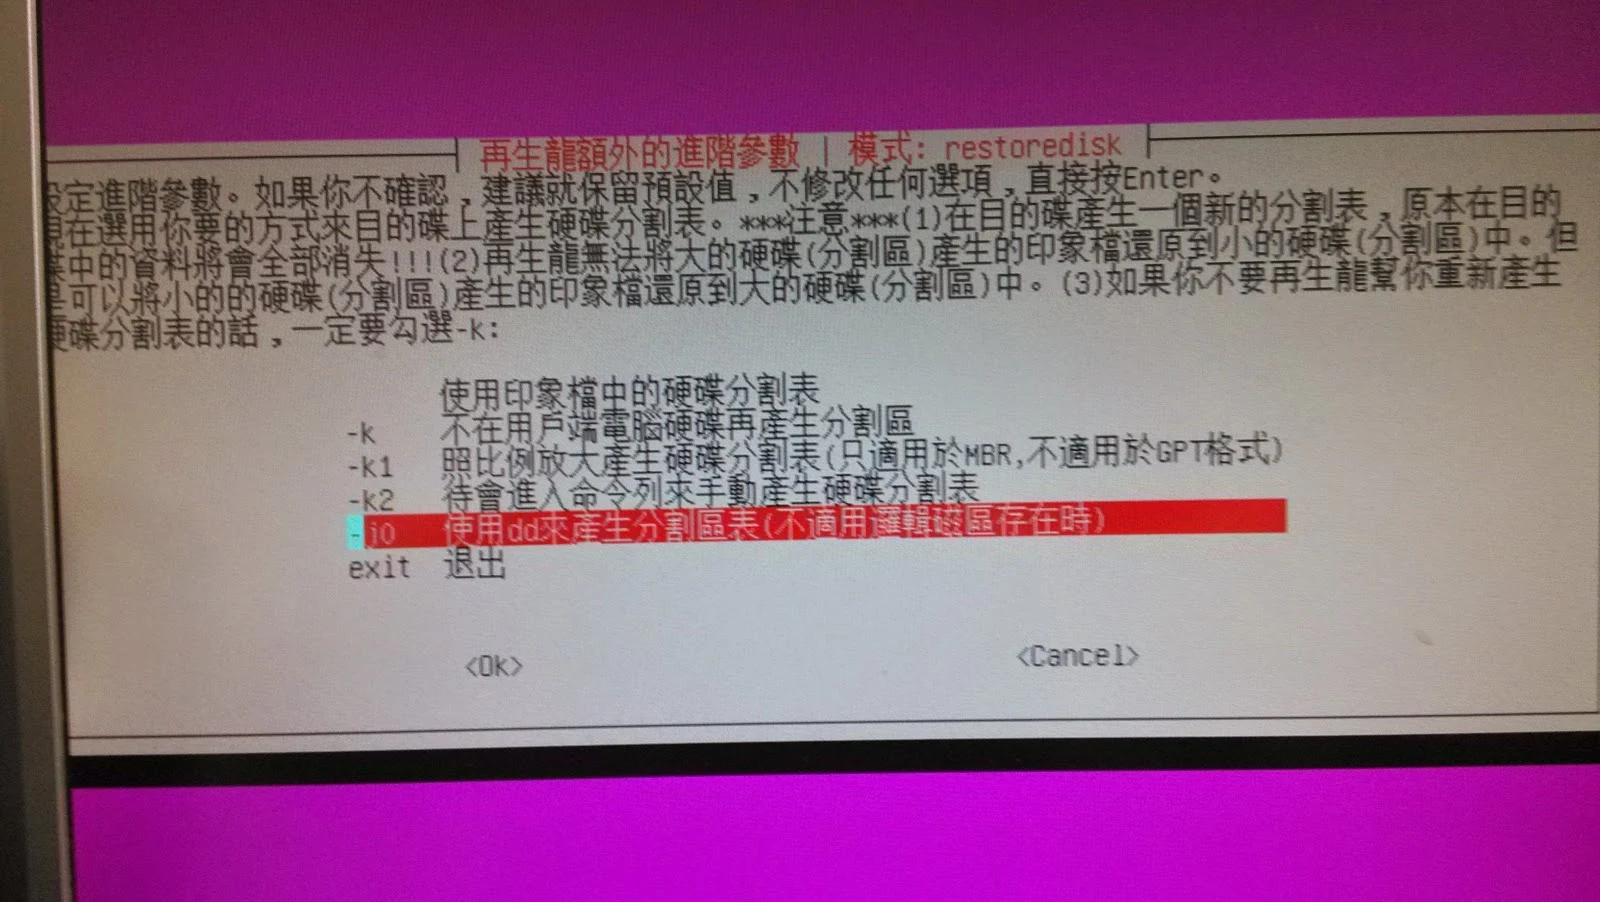
如何把L4620(新北市六期電腦)的映像檔還原到L480(四期租賃案)的電腦中,在clonezilla live用初學者模式是做不到的,必需用專家模式,有試過蕭老師說的-icds -k1還是不行,最後試到的是dd完成任務。


這裡要選專家模式


這裡要選icds(忽略硬碟大小)

這裡要選擇用-j0(用dd來産生分割區...)


2014年12月2日

網站限制IP存取

編輯apache2.conf
在ubutnu server下
sudo  vim /etc/apache2/apache2.conf
(在centos下是vim /etc/httpd/conf/httpd.conf)
找到網站目錄,例如:網站目錄是在/var/www資料夾中
<Directory /var/www/>
        Options Indexes FollowSymLinks
        AllowOverride None
</Directory> 
apache 2.4加入:
Require all denied
Require all granted
Require host xxx.com
Require ip 192.168.1 192.168.2
Require local


apache2.2加入:
        Order deny,allow
        Deny from all
        Allow from 163.20.
        Allow from 10.
變成
<Directory /var/www/>
        Options Indexes FollowSymLinks
        AllowOverride None
        Order deny,allow
        Deny from all
        Allow from 10.
        Allow from 163.20.

</Directory>
或是

<Directory /var/www/>
        Options Indexes FollowSymLinks
        AllowOverride None
      Require all denied
      Require ip 10.0.0.0/8 163.20.xx.0/24
      Require host xxx.ntpc.edu.tw
</Directory>
重新啟動apache
sudo /etc/init.d/apache2 restart

2014年11月19日

nautilus大量改檔名

有家長向我說:在整相片時,會有需要把相機裡的檔案整理成方使識別的檔名,在新北市教育作業系統裡有沒有大量改檔名的功能,我記得nautilus有這個功能,找了一下,也試了一些程式,發現這個最好用。
程式引用:https://gist.github.com/hackedbellini/1230574/

我把它中文化並且稍微改了小地方,下載點:
https://drive.google.com/file/d/0Bz6-J_NwALFBQzV0S2hWZWVETlU/view?usp=sharing

下載放在家目錄中再開啟終端機,執行下列指令(不需要最高權限)
chmod +x ~/大量更名
cp ~/大量更名 ~/.local/share/nautilus/scripts/

如果其他使用者要用也需把它拷貝到使用者的家目錄中。

這個功能會收錄進下一版的新北市教育作業系統中。

使用方式很簡單,先選擇多個檔案,在檔案上按滑鼠右鍵選擇命令稿/大量更名

2014年11月13日

網站apache2快取加速expires

看了一些文章,做個記錄。想要網站可以快速呈現,瀏覽器的快取是好用的,但網站資料如何讓瀏覽器可以快取,哪些東西要快取,哪些不要,又要快取多少時間呢?
google建議使用expires方式,查了一下資料和實做一下。真的有用。
1.開啟expires功能
sudo a2enmod expires

2.編輯設定檔
vim 000-default.conf
找到
<VirtualHost *:80>
        ....
        ........

        DocumentRoot /var/www
####加入下列資料
        <IfModule mod_expires.c>
          <FilesMatch "\.(png|css|js|jpe?g|gif)$">
                      ExpiresActive On
                      ExpiresDefault "access plus 30 days"
          </FilesMatch>
        </IfModule>


        <Directory />
藍色部分也可以是下列內容
          ExpiresActive on

          ExpiresByType image/jpg "access plus 60 days"
          ExpiresByType image/png "access plus 60 days"
          ExpiresByType image/gif "access plus 60 days"
          ExpiresByType image/jpeg "access plus 60 days"

          ExpiresByType text/css "access plus 1 days"

          ExpiresByType image/x-icon "access plus 1 month"

          ExpiresByType text/javascript "access plus 1 week"
          ExpiresByType application/x-javascript "access plus 1 week"
          ExpiresByType application/javascript "access plus 1 week"
3.重新啟動apache2
sudo /etc/init.d/apache2 restart
 
沒有看到錯誤內容,即完成設定,可以去檢查一下網站速度是否有變快。 


2014年10月22日

git筆記


第一次自己上傳專案,記錄一下。感謝士立線上即時教學。
照文件建立專案
touch README.md
git init
git add README.md

git config --global user.name "帳號"
git config --global user.email "xxx@gmail.com"
 
git commit -m "first commit" git remote add origin https://github.com/帳號/專案名稱
git push -u origin master


下載檔案
git clone 專案網址


上傳檔案

git add .
git commit -m "說明文字"
git push
這樣檔案應該都會上去了

2014年10月12日

ntpc U&M安裝s2a

記錄一下在新北市教育作業系統安裝s2a實(scratch2先升級到最新版)
參考文章:http://www.computacaonaescola.ufsc.br/?page_id=503&lang=en
1.安裝python-pip
sudo -s
apt-get update 
apt-get install python-pip
 
2.顯示 pre-installed Python 套件:
pip freeze
 
3.如果沒有出現任何像pyserial==2.5 or pyserial==2.7 在清單中請建立使用 pip, 並安裝 PySerial:
 pip install PySerial
 
4.安裝 PyMata 為了串行通訊在Python 用 Firmata 在 Arduino (PySerial 需要事先安裝 ):
pip install PyMata   
  
5.下載s2a到家目錄
https://github.com/MrYsLab/s2a_fm
 
6.解壓縮,並複製s2a_fm_base_zh_tw.sb2到文件資料夾中

 unzip s2a_fm-master.zip
chmod -R 777  s2a_fm-master
 cp s2a_fm-master/ScratchFiles/ScratchProjects/s2a_fm_base_zh_tw.sb2 ~/Documents/
 chmod 777 ~/Documents/s2a_fm_base_zh_tw.sb2
 
7.開啟終端機
sudo -s

cd ~/cd s2a_fm-master
 python s2a_fm.py /dev/ttyACM0
 
為了避免學生輸入一堆英文字,可以把這一段做成一個sh內容如下
#!/bin/bash 
cd ~/
cd s2a_fm-master
 python s2a_fm.py /dev/ttyUSB0 
 
並做成一個.desktop來執行 

8.看到
s2a_fm version 1.5   Copyright(C) 2013-14 Alan Yorinks    All Rights Reserved 
PyMata version 1.58  Copyright(C) 2013-14 Alan Yorinks    All rights reserved.

Opening Arduino Serial port /dev/ttyACM0 
Please wait while Arduino is being detected. This can take up to 30 seconds ...
Board initialized in 0 seconds
Total Number of Pins Detected = 20
Total Number of Analog Pins Detected = 6
Please wait for Total Arduino Pin Discovery to complete. This can take up to 30 additional seconds.
Arduino Total Pin Discovery completed in 0 seconds
Starting HTTP Server!
Use <Ctrl-C> to exit the extension

Please start Scratch or Snap!
表示連線成功
9.啟動scratch2,並開啟文件資料夾中的s2a_fm_base_zh_tw.sb2
看到 下圖表示連線成功可以運作了。

ntpc drbl ui介面

這幾天心血來潮,覺得可以完成,努力了一下。好像有譜了。
新北市的學校使用drbl當還原主機,drbl功能很強,但問的也得多,有些初學者不是很清楚,於是自己弄了一個簡單的UI界面,把常用功能做一個集合。
1.安裝:請在drbl主機上開啟終端機,貼上下列內容
sudo -s
cd /usr/share
wget ftp://163.20.108.1/open/ntpc_drbl.tgz
tar -xzvf ntpc_drbl.tgz
rm ntpc_drbl.tgz
cp ntpc_drbl/drbl.desktop /usr/share/applications/
cp ntpc_drbl/drbl.svg  /usr/share/pixmaps/
chmod +x /usr/share/applications/drbl.desktop
cp ntpc_drbl/drbl.desktop ~/Desktop

chmod 777 ~/Desktop/drbl.desktop
cp ntpc_drbl/drbl.svg /usr/share/icons/

這樣在桌面和程式集中都會有一個啟動圖示


操作教學可以參考這個教學錄影檔