2021年12月17日

G5T感測器資料

資料來源:http://maker.tn.edu.tw/modules/tad_book3/page.php?tbsn=21&tbdsn=379

 PMS5003T 主動式傳輸協議
默認串列傳輸速率: 9600bps 校驗位:無 停止位: 1 位
協議總長度: 32 位元組 

1 起始符 1 0x42 (固定)
2 起始符 2 0x4d (固定)
3 幀長度高八位 幀長度=2x13+2(資料+校驗位元)
4 幀長度低八位
5 數據 1 高八位 *資料 1 表示 PM1.0 濃度(CF=1,標準顆粒物)單位μ g/m3
6 數據 1 低八位
7 數據 2 高八位 資料 2 表示 PM2.5 濃度(CF=1,標準顆粒物)
單位μ g/m3
8 數據 2 低八位
9 數據 3 高八位 資料 3 表示 PM10 濃度(CF=1,標準顆粒物)
單位μ g/m3
10 數據 3 低八位
11 數據 4 高八位 *資料 4 表示 PM1.0 濃度(大氣環境下)
單位μ g/m3
12 數據 4 低八位
13 數據 5 高八位 資料 5 表示 PM2.5 濃度(大氣環境下)
單位μ g/m3
14 數據 5 低八位
15 數據 6 高八位 資料 6 表示 PM10 濃度 (大氣環境下)
單位μ g/m3
16 數據 6 低八位
17 數據 7 高八位 資料 7 表示 0.1 升空氣中直徑在 0.3um 以上
顆粒物個數
18 數據 7 低八位
19 數據 8 高八位 資料 8 表示 0.1 升空氣中直徑在 0.5um 以上
顆粒物個數
20 數據 8 低八位
21 數據 9 高八位 資料 9 表示 0.1 升空氣中直徑在 1.0um 以上
顆粒物個數
22 數據 9 低八位
23 數據 10 高八位 資料 10 表示 0.1 升空氣中直徑在 2.5um 以上
顆粒物個數
24 數據 10 低八位
25 數據 11 高八位 溫度。 注:真實溫度值=本數值/10
單位:℃
26 數據 11 低八位
27 數據 12 高八位 濕度。 注:真實濕度值=本數值/10
單位:%
28 數據 12 低八位
29 數據 13 高八位 版本號
30 數據 13 低八位 錯誤代碼
31 資料和校驗高八位元 校驗碼=起始符 1+起始符 2+……..+數據 13 低八位
32 資料和校驗低八位元


 注:標準顆粒物質量濃度值是指用工業金屬顆粒物作為等效顆粒進行密度換算得到的品質濃度值,適用於工業生產車間等環境。大氣環境顆粒物質量濃度值以空氣中主要污染物為等效顆粒進行密度換算,適用于普通室內外大氣環境。

程式範例

#include <SoftwareSerial.h>
SoftwareSerial PmsSerial(2, 3); // RX, TX
 
static unsigned int pm_cf_10;           //定義全域變數
static unsigned int pm_cf_25;
static unsigned int pm_cf_100;
static unsigned int pm_at_10;
static unsigned int pm_at_25;
static unsigned int pm_at_100;
static unsigned int particulate03;
static unsigned int particulate05;
static unsigned int particulate10;
static unsigned int particulate25;
static float sencorT;
static float sencorH;
 
void getG5(unsigned char ucData)//獲取G5的值
{
  static unsigned int ucRxBuffer[250];
  static unsigned int ucRxCnt = 0;
  ucRxBuffer[ucRxCnt++] = ucData;
  if (ucRxBuffer[0] != 0x42 && ucRxBuffer[1] != 0x4D)//資料頭判斷
  {
    ucRxCnt = 0;
    return;
  }
  if (ucRxCnt > 32)//資料位元數判斷//G5T為32
  {
       pm_cf_10=(int)ucRxBuffer[4] * 256 + (int)ucRxBuffer[5];      //大氣環境下PM2.5濃度計算       
       pm_cf_25=(int)ucRxBuffer[6] * 256 + (int)ucRxBuffer[7];
       pm_cf_100=(int)ucRxBuffer[8] * 256 + (int)ucRxBuffer[9];
       pm_at_10=(int)ucRxBuffer[10] * 256 + (int)ucRxBuffer[11];              
       pm_at_25=(int)ucRxBuffer[12] * 256 + (int)ucRxBuffer[13];
       pm_at_100=(int)ucRxBuffer[14] * 256 + (int)ucRxBuffer[15];
       particulate03=(int)ucRxBuffer[16] * 256 + (int)ucRxBuffer[17];
       particulate05=(int)ucRxBuffer[18] * 256 + (int)ucRxBuffer[19];
       particulate10=(int)ucRxBuffer[20] * 256 + (int)ucRxBuffer[21];
       particulate25=(int)ucRxBuffer[22] * 256 + (int)ucRxBuffer[23];
       sencorT=((int)ucRxBuffer[24] * 256 + (int)ucRxBuffer[25])/10;
       sencorH=((int)ucRxBuffer[26] * 256 + (int)ucRxBuffer[27])/10;
       
        
    if (pm_cf_25 >  999)//如果PM2.5數值>1000,返回重新計算
    {
      ucRxCnt = 0;
      return;
    }
     
    ucRxCnt = 0;
    return;
  }
 
}
 
void setup() {
   PmsSerial.begin(9600);
   PmsSerial.setTimeout(1500);
   Serial.begin(9600);
   Serial.print("PM_CF1.0");Serial.print(",");
   Serial.print("PM_CF2.5");Serial.print(",");
   Serial.print("PM_CF10");Serial.print(",");
   Serial.print("PM_AQI1.0");Serial.print(",");
   Serial.print("PM_AQI2.5");Serial.print(",");
   Serial.print("PM_AQI10");Serial.print(",");
   Serial.print("PM_count03");Serial.print(",");
   Serial.print("PM_count05");Serial.print(",");
   Serial.print("PM_count10");Serial.print(",");
   Serial.print("PM_count25");Serial.print(",");
   Serial.print("Temperature");Serial.print(",");
   Serial.println("Humandity");
    
   Serial.print("(ug/m3)");Serial.print(",");
   Serial.print("(ug/m3)");Serial.print(",");
   Serial.print("(ug/m3)");Serial.print(",");
   Serial.print("(ug/m3)");Serial.print(",");
   Serial.print("(ug/m3)");Serial.print(",");
   Serial.print("(ug/m3)");Serial.print(",");
   Serial.print("(pcs/0.01cf)");Serial.print(",");
   Serial.print("(pcs/0.01cf)");Serial.print(",");
   Serial.print("(pcs/0.01cf)");Serial.print(",");
   Serial.print("(pcs/0.01cf)");Serial.print(",");
   Serial.print("(C)");Serial.print(",");
   Serial.println("(%)");
}
 
void loop() {
  while (PmsSerial.available()) {
    getG5(PmsSerial.read());
  }
  Serial.print(pm_cf_10);Serial.print(",");
  Serial.print(pm_cf_25);Serial.print(",");
  Serial.print(pm_cf_100);Serial.print(",");
  Serial.print(pm_at_10);Serial.print(",");
  Serial.print(pm_at_25);Serial.print(",");
  Serial.print(pm_at_100);Serial.print(",");
  Serial.print(particulate03);Serial.print(",");
  Serial.print(particulate05);Serial.print(",");
  Serial.print(particulate10);Serial.print(",");
  Serial.print(particulate25);Serial.print(",");
  Serial.print(sencorT);Serial.print(",");
  Serial.println(sencorH);
 
  delay(2000);
}


2021年12月1日

ventoy改開機畫面 windows開機執行及差異備份

ventoy改變開機畫面

參考文章:https://webnas.bhes.ntpc.edu.tw/wordpress/archives/23125

 參考文章:https://www.ventoy.net/cn/plugin_theme.html

ventoy基於grub2,到網址:https://www.gnome-look.org/browse?cat=109&ord=latest 

下載themes,解壓縮到ventoy磁碟下的ventoy資料夾中,在ventoy.json檔案中加入設定

"theme": {
        "file": "/ventoy/themes/monterey-grub-theme/theme.txt",
        "gfxmode": "1920x1080",
        "display_mode": "GUI",
        "serial_param": "--unit=0 --speed=9600",
        "ventoy_left": "5%",
        "ventoy_top": "95%",
        "ventoy_color": "#eff0f1",
           },


ventoy 開機預設選項

在ventoy資料夾下編輯ventoy.json檔案加入以下內容:

"control": [
        { "VTOY_MENU_TIMEOUT": "10" },
        { "VTOY_DEFAULT_IMAGE": "/vhd/win10_chd_work.vhdx" }
    ]


選單列表

"image_list": [
        "/os/USBOX_V6.iso",
        "/os/win10/work.vhdx",
        "/os/win10/chd.vhdx"
    ],

選單別名

"menu_alias": [
        {
            "image": "/os/USBOX_V6.iso",
            "alias": "維護用 PE"
        },
        {
            "image": "/os/win10/work.vhdx",
            "alias": "啟動 Win10"
        },
        {
            "image": "/os/win10/chd.vhdx",
            "alias": "啟動 Win10 還原"
        }
    ],

選單加密 

"password": {
        "menupwd": [
            {
                "file":"/os/win10/chd.vhdx",
                "pwd":"txt#password"
            }
        ]
    } 

windows vhd差異備份

以最高權限執行命令視窗,輸入下列指令

diskpart

create vdisk file="d:\vhd\xxxx.vhd" parent="d:\vhd\source.vhd"


windows開機執行

Windows 鍵 + R,輸入 shell:startup,然後選取 [確定]。這會開啟 [啟動] 資料夾。
把要執行的程式拷貝到這裡,就會自動執行。

@echo off

copy d:\vhd\base.vhdx d:\vhd\work.vhdx

shutdow -r -t 0 -f


擴容

select vdisk file="目標檔名"
list vdisk
expand vdisk maximum=大小(G,*1024)
attach vdisk
list volume
select volume 分割區編號
extend
list volume
detach vdisk
exit

2021年11月12日

win10下安裝MQTT Broker服務

win10下安裝MQTT Broker服務

參考文章:https://swf.com.tw/?p=1005

1.官網下載程式:https://mosquitto.org/download/

個人下載64位元的.exe,下載後安裝。安裝好程式集中什麼也沒有。

 2.停用Mosquitto Broker服務

在本機上按右鍵/管理,找到服務/mosquitto服務,它的預設是自動,但未啟動,按下停用鈕。


3.到防火牆中把1883,1884埠打開。

在防火牆的進階設定/新增規則,選連接埠,輸入1883,1884,允許連線,所有網路連線都打勾,名稱輸入MQTT。


4.修改mosquitto.conf

把c:\program files\mosquitto\mosquito.conf拷一份到文件中,使用記事本打開,在最後面加上以下內容

listener 1883
protocol mqtt
listener 1884
protocol websockets
allow_anonymous true
socket_domain ipv4 
編輯好記得複製貼回 c:\program files\mosquitto\

5.重啟mosquitto Broker服務:

以最高權限開啟命令視窗,進入c:\program files\mosquitto資料夾
執行mosquitto -v -c mosquito.conf 


2021年11月10日

github資料

 1.網址:https://github.com/

2.註冊:點選右上方Sign up,依續輸入email 密碼 username ..要不要用mail收資料..驗證是不是真人...收email,輸入認證code ,最後成功畫面如下:


3. 把別人的網站fork一份:

參考文章

https://git-scm.com/book/zh-tw/v2/GitHub-%E5%8F%83%E8%88%87%E4%B8%80%E5%80%8B%E5%B0%88%E6%A1%88

把osep web serial api fork一份吧

https://github.com/estea8968/osep_web_serial

按右上方的fork按鈕,你就有一份一模一樣的資料了。


4.專案設定web位置:

https://ithelp.ithome.com.tw/articles/10171911

在專案位置,按下右邊Settings設定鈕,再選左邊Pages按鈕,選一個佈景。在source按鈕選master。約過了3-5分鐘,按下連結,就會看到網頁了。但它不是scratch的網頁。按下左上角,code按鈕,再按下右邊設定圖示(小的),可以在這裡告訴別人,要連app資料夾。


5.更新github


6.github常用指令

git add .

git commit -m "說明文字"

git push -u origin


7.github token

https://iter01.com/611911.html

現在不能再用帳密更新上傳了,必需使用token。上傳時第一次打密碼時,要輸入token的值,很長,建議用貼的,申請完記起來,這個token最長可以用一個月,下個月要再申請一之。


2021年11月6日

scratch3寫入google試算表

使用scratch3積木寫入google試算表。
1.先建立一個試算表,目前只開放寫入3個欄位,欄位名稱不拘。
2.點選工具/指令碼編輯器
3.貼上下列內容並儲存。檔案ID是試算表網址中/d/後的那串文字,例如https://docs.google.com/spreadsheets/d/6usMPxfIe4MzwP9PY/edit#gid=0

function doGet(e) {
  var params = e.parameter;
  var column1 = params.c1;
  var column2 = params.c2;
  var column3 = params.c3;
  var column4 = params.c4;
  var column5 = params.c5;
  var column6 = params.c6;
  var column7 = params.c7;
  var column8 = params.c8;
  var date = new Date();
  var now = date.getFullYear()+'/'+(date.getMonth() + 1)+'/'+date.getDate() + ' '+ date.getHours() + ':' + date.getMinutes() + ':' + date.getSeconds();


  //sheet資訊
  var SpreadSheet = SpreadsheetApp.openById("檔案ID");
  var Sheet = SpreadSheet.getSheets()[0];
  var LastRow = Sheet.getLastRow();

  //存入資訊
  Sheet.getRange(LastRow+1, 1).setValue(column1);
  Sheet.getRange(LastRow+1, 2).setValue(column2);
  Sheet.getRange(LastRow+1, 3).setValue(column3);
  Sheet.getRange(LastRow+1, 4).setValue(column4);
  Sheet.getRange(LastRow+1, 5).setValue(column5);
  Sheet.getRange(LastRow+1, 6).setValue(column6);
  Sheet.getRange(LastRow+1, 7).setValue(column7);
  Sheet.getRange(LastRow+1, 8).setValue(column8);
  Sheet.getRange(LastRow+1, 9).setValue(now);
 
  //回傳資訊
  return ContentService.createTextOutput("ok");
}

4.點選發佈/部署為網應用程式。
5.新增版本號、選擇所有人可以使用app,按下更新後複製起網址。
每一次異動程式碼都需要再做一次發佈動作

6.回到scratch中開啟JSON擴充積木,拉出積木。先輸入你要送出的資料(最多三欄),再貼上複製的網址。如果是先貼上網址會造成積木變長,不方便輸入送出資料。這樣在google試算表中看到寫入的資料。


2021年11月4日

MQTT記事


參考:https://ithelp.ithome.com.tw/articles/10226629

1.安裝MQTT server 

sudo apt install mosquitto
2.安裝MQTT client
sudo apt install mosquitto-clients 
 
mosquitto_sub : 訂閱
mosquitto_pub : 發布
-d : debug 模式 => debug
-t : 訂閱的主題 => topic
-h : Broker 的 IP => host
-m : 發送的內容 => message
-v : 顯示主題名稱 => verbosely
 

終端機-1 (Subscribe)訂閱

mosquitto_sub -d -t Try/MQTT 
mosquitto_sub -d -h 54.xx.xx.xx -t Try/MQTT

終端機-2 (Publish)發佈

mosquitto_pub -d -t Try/MQTT -m "Try Message"
mosquitto_pub -d -h 54.xx.xx.xx -t Try/MQTT -m "Try Message"

使用帳密

mosquitto_passwd -c <passwordfile> <username>
指定密碼檔案 
sudo mosquitto_passwd -c /etc/mosquitto/passwd try   
這樣會覆蓋掉原來的passwd檔。先編一個帳密碼
vim usr.pwd
內容如下
user:123456
student:123
使用指令轉成加密檔 
mosquitto_passwd  -U usr.pwd 
sudo mv  usr.pwd /etc/mosquitto/
 

設定ACL(Access Control List)

sudo vi /etc/mosquitto/acl 
內容如下 
# 用戶 try 能夠讀寫 Try/MQTT這個主題
#user try 
#topic readwrite Try/MQTT
(設定後失敗,先註解掉) 

mosquitto.conf 參數檔案,開啟模式

打開 mosquitto.conf 參數檔案
設定檔位置在 /etc/mosquitto/mosquitto.conf

增加

listener 1883
protocol mqtt
listener 8081 127.0.0.1
protocol websockets
allow_anonymous true
這樣js 才能用ws://127.0.0.1:8081連線 
 
password_file /etc/mosquitto/passwd
per_listener_setting true
acl_file /etc/mosquitto/acl
 
per_listener_setting參數設成true,代表個別設置每個偵聽器物件的安全性: 
allow_anonymous 允許匿名存取,設成false 代表需使用者名稱。
password_file 帳號密碼的檔案
acl_file 對於使用者權限的設置檔案
 
重啟服務
sudo service mosquitto stop
sudo service mosquitto start 
訂閱 
mosquitto_sub -v -d -t Try/MQTT -u "try" -P "xxxx"  
mosquitto_sub -d -t Try/MQTT 
mosquitto_sub -d -h 54.xx.xx.xx -t Try/MQTT
發佈 
mosquitto_pub -d -t Try/MQTT -m "Try Message"  
mosquitto_pub -d -h 54.xx.xx.xx -t Try/MQTT -m "Try Message"


 測試了一下一個網站還不錯:

http://mqttgo.io/

使用osep離線版線線網址為:

ws://MQTTGO.io:8000/mqtt


2021年9月27日

ventoy另類思維

 ventoy是很好用的工具,自已另類想法:

1.ventoy安裝到硬碟

2.用virtualbox安裝系統,把vhd複製(如果要去掉ssid,virtualbox的系統工具中有複製工具可以使用)出來

3.把這個vhd在winpe下做出一級副本(差異備份只有4MB)。直接複製一級副本為另一個檔案為平常開機使用的vhd。

4.把平常開機的vhd設成預設開機並把開機時間設成1秒。

一般使用者正常使用,有問題進入winpe,出事的檔案刪掉再複製一級副本成開機vhd,完工。

平常資訊組只要做第4個就可以了。遇到到升級就要動到最原始vhd,再産生一級副本,再複製成開機的vhd.

ventoy 要使用 vhd開機需要把ventoy所在碟磁第一分割區格式化為ntfs,及在磁碟下增加一個ventoy資料夾 並且把ventoy_vhdboot.img放入其中。可以參考文章:https://www.ventoy.net/cn/plugin_vhdboot.html

 ventoy設開機預設選項及開機秒數做法也很簡單,在磁碟的下 ventoy資料夾下增加一個ventoy.json檔案。內容為

{
    "control": [
        { "VTOY_MENU_TIMEOUT": "10" },
        { "VTOY_DEFAULT_IMAGE": "/vhd/win10_tmp.vhdx" }
    ]
}

參考文章:https://www.ventoy.net/en/plugin_control.html 

産生一級副本方式:

在winpe下使用最高權限開啟命令視窗,執行

diskpart

create vdisk file="d:\vhd\xxxx.vhd" parent="d:\vhd\source.vhd"

參考文章:https://docs.microsoft.com/en-us/previous-versions/windows/it-pro/windows-server-2012-r2-and-2012/gg252579(v=ws.11)

 https://docs.microsoft.com/zh-tw/windows-hardware/manufacture/desktop/boot-to-vhd--native-boot--add-a-virtual-hard-disk-to-the-boot-menu

https://class.tn.edu.tw/modules/tad_web/news.php?WebID=1384&NewsID=7363

 http://andy51002000.blogspot.com/2017/07/vhd.html

winpe製作安裝參考:

https://docs.microsoft.com/zh-tw/windows-hardware/manufacture/desktop/winpe-create-usb-bootable-drive


2021年9月15日

google drive

 記錄一下,好像不錯用。

https://blog.steveyi.net/linux-mount-googledrive-not-required-brain/

 sudo add-apt-repository ppa:alessandro-strada/ppa 

sudo apt-get update 

sudo apt-get install google-drive-ocamlfuse 

mkdir ~/GoogleDrive

google-drive-ocamlfuse ~/GoogleDrive

fusermount -u ~/GoogleDrive  

google-drive-ocamlfuse –help

2021年9月2日

esp32 arduino ide 編譯error

參考文章:https://youyouyou.pixnet.net/blog/post/119410732


首先在進入「檔案>偏好設定」,在「額外的開發板管理員網址」裡面加上以下的網址:

https://dl.espressif.com/dl/package_esp32_index.json 

接著再到選單「工具>開發板>開發板管理員」,尋找「es32」,就能找到我們要的選項,安裝它就可以了!

再來就找得到NodeMCU-32S

 arduino ide 編譯時出現 error

.arduino15/packages/esp32/tools/esptool_py/2.6.1/esptool.py", line 37, in <module>
      import serial
      ImportError: No module named serial
解決方式:
sudo apt install python-is-python3
pip3 install pyserial
 
再編譯,錯誤訊息就沒了。


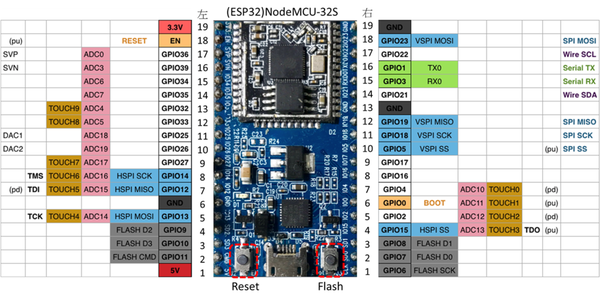
另一款腳位圖


  • GPIO 34,35,36,39:Input only(不能作為輸出腳位)
  • GPIO 0,6,7,8,9,10,11:系統用,勿使用(淺灰色標示)
  • GPIO 18:重開機

還有一些個人遇到的問題(不清楚原因,但會搞死你)

  • 1. DHT11不可以用GPIO 5、26
  • 2. GPIO 12, 2燒錄時不可接任何裝置,請空接,燒錄完成後,再接回,否則會上傳失敗。
  • 3.WiFi啟動後,2,4,12,13,14,15,25,26,27僅能數位讀取,不可類比


有一款esp32腳位標在背面,插入擴充板後完全看不到。


oled qrcode

可以參考這篇

https://techtutorialsx.com/2017/12/16/esp32-arduino-ssd1306-oled-drawing-a-qr-code/


2021年8月20日

arduino uno 當bootloader

參考文章:

 http://programmermagazine.github.io/201405/htm/article1.html


兩張板子的 pin 11 ~ pin 13 兩兩對接,pin 11 接 pin 11,pin 12 接 pin 12,pin 13 接 pin 13。 兩張板子的 5V 與 Gnd 也是兩兩對接,5V 接 5V,Gnd 接 Gnd。 最後,ArduinoISP 的 pin 10 接到 Target board 的 Reset pin。

2021年8月19日

picoboard變uno

 記錄一下,免得又忘了。

motoduino的picoboard 是用ATmega328晶片去做的。用志文老師的方法,可以把picoboard改韌體,變成一片uno。


找一塊uno,燒錄範例arduinoisp,把燒錄器改成arduino as ISP,再選擇工具/bootloader。燒錄bootloader前要把腳位接好,可以參考之前的文章。

https://wdpsestea.blogspot.com/2019/11/picoboarduno.html

燒好後,各感應器的腳位為:

1.J4-A1(D15),

2J3-A2(D16),

3J2-A4(D18),

4按鈕D2,

5.J1-A5(D19),

6光敏A6(D20),

7.聲音micA3(D17),

8滑桿(A0)]

但我使用digitalRead(2)一直讀不出按鈕的值。看了好多文章,都無解。

最後終於查到這個D2要額外啟動才行

在void setup()要加上

    DDRD  &= ~( 1 << PD2 );     // Clear the PD2 pin and set PD2 (PCINT0 pin) now as input
    PORTD |= (1 << PD2);        // Set PIN PD2 as INPUT with pull-up enabled

    EICRA |= (1 << ISC00);      // set INT0 to trigger on ANY logic change
    EIMSK |= (1 << INT0);       // Turns on INT0

按鈕未按時,D2的值是1,按下去D2的值是0


2021年8月10日

自走車之於教學

 1.展示自走車並觀察之

2.提問自走車為何會動


3.馬達作動原理?


4.把3V的直流電正反試接,馬達有何反應?


 5.馬達轉速如何調整?


6.規納出直流馬達作動的二要素:正反轉和轉速


7.數位與類比,正反轉是?轉速是?


8.使用microbit找出數位和類比腳位,做出使馬達作動


9.自走之有二個馬達,前進後退左右轉,這二個馬達是如何相互配合做動?(凱斯車子馬達腳位被設定了無法改變,p1  p2為馬力pwm輸出,p8 p12為正反轉數位輸出)


2021年8月7日

web serial api記事

不錯的文章 

https://wicg.github.io/serial/

https://github.com/svendahlstrand/web-serial-api

https://github.com/rafaelaroca/web-serial-terminal

 https://ithelp.ithome.com.tw/articles/10161189

 連線

port = await navigator.serial.requestPort({});
await port.open({ baudRate: 9600 });

寫入資料

const encoder = new TextEncoder();
const writer = port.writable.getWriter();
await writer.write(encoder.encode(value));
writer.releaseLock();

讀出資料

reader = port.readable.getReader();
let value = await reader.read();
let uint8array = new TextEncoder().encode("¢");
let string = new TextDecoder().decode(value.value);
string = string.split('\r\n');
analog_inputs[pin] = string[0];
//console.log('analog_inputs[pin]=',analog_inputs[pin]);
reader.releaseLock();


scratch-gui無法用async 需要npm  install  babel-polyfill

//async await estea
require('babel-polyfill');


arduino code

void setup() {
  Serial.begin(115200);
  pinMode(13, OUTPUT);
}
void loop() {
  int cmd = Serial.parseInt();
  if(cmd == 1){
    digitalWrite(13, HIGH);   
  }else if (cmd == -1){
    digitalWrite(13, LOW);   
  }
  Serial.println(analogRead(A0));
}

2021年7月23日

多重開機隨身碟ventoy

 試了一下還不錯用,安裝也相當簡單。只要安裝好後把iso放入即可使用,支援grub和uefi。

下載ventoy:https://www.ventoy.net/en/download.html

 我使用linux下載.gz檔,並解壓縮

進入解壓縮目錄,看一下README,開啟終端機執行

sudo sh Ventoy2Disk.sh  -i /dev/sdX

sdX為隨身碟代號

再來把iso複製進入隨身碟就完工了。


2021年7月1日

在OSEP中使用NodeMCU ESP8266

在OSEP中使用NodeMCU ESP8266

0.認識NodeMCU

D0==>16
D1==>05
D2==>04
D3==>00
D4==>02
D5==>14
D6==>12
D7==>13
D8==>15
D9==>03
D10==>01

GPIO是什麼:https://zh.wikipedia.org/wiki/GPIO

類比腳位是A0

esp8266介紹:https://pcbdesign88.wordpress.com/2018/04/11/nodemcu%E9%96%8B%E7%99%BC%E6%9D%BFesp8266-wifi%E6%A8%A1%E7%B5%84%E4%BB%8B%E7%B4%B9/

 1.安裝osep

安裝osep 

2.arduino ide燒錄韌體(含wifi ssid和密碼)

 arduino ide燒錄設定:https://wdpsestea.blogspot.com/2021/06/arduino-ide-nodemcu.html

注意:NodeMCU ESP8266只支援wifi 2.4G無線連接,請不要設定5G AP的連線

3.執行osep s3-extend-tool連上s3e


4.執行線上或是離線版的osep_scrathc3,開啟擴充套件esp8266

osep線上版:https://ys-fang.github.io/OSEP/app/


5.數位角位輸出亮led燈


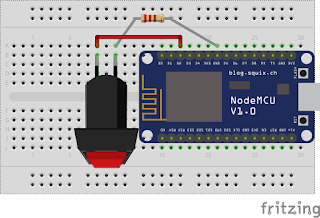
使用D2(GPIO12)來亮啟LED燈。


6.讀取數位角位信號


7.做類比數位輸出pwm-呼吸燈

8.讀取類比腳位信號

NodeMCU只有一個類比腳位A0


9.接伺服馬達

伺服馬達是高用電的設備,現在常見的伺服馬達,建議要接5V的外接電源,電流量要300MA,單一NodeMCU的電量不足以支持伺服馬達。圖使用腳位為D2(GPIO4)

10.超音波測距HC-SR04

圖使Echo用D1(GPIO5)和Trig用D2(GPIO4)

其他:

 fritzing:

https://fritzing.org/download/

 https://github.com/fritzing

https://www.npackd.org/p/fritzing/0.9.6


教學播放清單:

https://youtube.com/playlist?list=PL52qbzg6rwU65672-2hjKSuNagPTB_0cX

osep_scratch3線上版:https://sites.google.com/view/osep-scratch3/%E7%B7%9A%E4%B8%8A%E8%B3%87%E6%BA%90