2025年4月13日

ubuntu不使用snap安裝firefox

 ubuntu改用snap雖然有很多優點,但我遇到了開機使用firefox會lag問題,很討厭。

雖然我用了apt install firefox裝回來,但下次一升級又改回snap版了,很煩。

找到方法改設定了 ,記錄一下

1.在snap移除snap,並清除乾淨。

sudo snap remove firefox

sudo rm -rf /var/lib/snapd/seed/snaps/firefox_*.snap

2.加入官方版的ppa

sudo add-apt-repository ppa:mozillateam/ppa

 3.防止倉庫優先使用snap安裝firefox

echo '
Package: firefox*
Pin: release o=Ubuntu*
Pin-Priority: -1
' | sudo tee /etc/apt/preferences.d/firefox-no-snap
4.讓官方版自動更新
echo 'Unattended-Upgrade::Allowed-Origins:: "LP-PPA-mozillateam:${distro_codename}";' | sudo tee /etc/apt/apt.conf.d/51unattended-upgrades-firefox
5.安裝火狐
sudo apt update 
sudo apt install firefox firefox-locale-zh-hant


2024年1月10日

osep_scratch切換鏡頭

 記錄一下自已改的地方

src/lib/video/camera.js

在const requestStack = [];後面加上

/*add by chen 20221209 end */

在const requestVideoStream = videoDesc => {
    let streamPromise;
後面加上

let video_value ={};
    const webcamId= `${window.now_webcamId}`;
    if (webcamId == "user"){
        video_value = {facingMode: "user"};
    } else if ( webcamId == "environment" ){
        video_value = {facingMode: "environment"};
    } else{
      video_value = {deviceId: webcamId };
    }

修改video: videoDesc為

video: video_value,
        // video: videoDesc ,video:{facingMode: "user"}, {facingMode: "environment"},video:{deviceId: "xxxx" }


2023年11月20日

u8g2繁中字型

 看了一篇文章,覺得不錯,把它實做了一下。

參考網址:https://www.kidsgo.net/u8g2/index.php

 簡繁中常用字型:https://github.com/kaienfr/Font/blob/master/learnfiles/chinese%E7%AE%80%E7%B9%81%E5%B8%B8%E7%94%A8%E5%AD%97%E8%A1%A8.txt

 我轉換好的字型檔:https://drive.google.com/file/d/19Mw1fSSWmxFYSHbvg457jsi362sWJ0L6/view?usp=sharing

 使用方法:

1.把字型檔和ino放在相同目錄

2.在ino中加入語法

#include <U8g2lib.h>

#include "u8g2_font_e58524b32706dda48e7107fc64bfd183.h"

U8G2_SSD1306_128X64_NONAME_1_HW_I2C u8g2(U8G2_R0, /* reset=*/ U8X8_PIN_NONE);
u8g2.setFont(u8g2_font_unifont_myfonts);


加入的中文字庫在說明文件中:https://docs.google.com/document/d/125J4c5W3LA7Bf7vy8gK1z82v_ekKfAIktCgZy0Krrls/edit?usp=sharing


2023年9月20日

ubuntu 下arduino ide無法寫入microbit磁碟機

 錯誤訊息:

Open On-Chip Debugger 0.10.0-dev-00254-g696fc0a (2016-04-09-12:07)


 解決方法:

cd /etc/udev/rules.d
sudo wget https://raw.githubusercontent.com/arduino/OpenOCD/master/contrib/60-openocd.rules
sudo udevadm control --reload-rules


2023年8月24日

esp32-cam記錄

參考文章: https://shop.mirotek.com.tw/iot/iot-start-2/

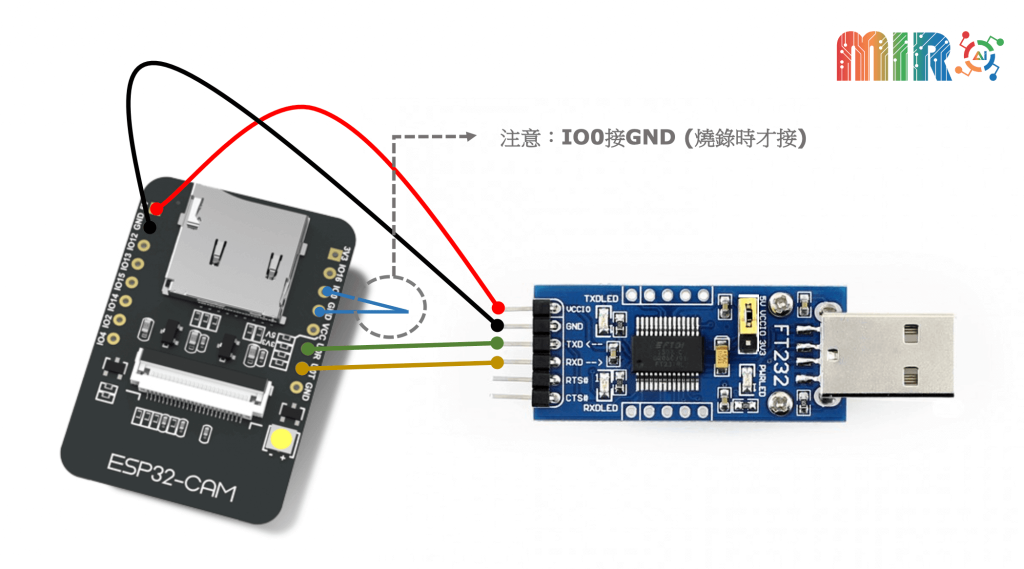
1.接線:燒錄時要準備一個jump把IO0和GND接起來。


 怎知道有接好否?把usb接上電腦,開啟arduino ide,打開serial monitor,把鮑率設為115200(通常是這鮑率,若無訊號可以改一下鮑率,如果都無訊號就是接錯),如果有看到...或亂碼大概就對了,按下reset鈕,就會看到類似下圖。

2.讓arduino ide認識esp32:在arduino ide(我用的是1.8.14)偏好設定位置填入網址:https://dl.espressif.com/dl/package_esp32_index.json


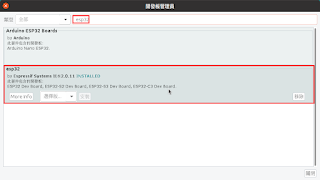
工具/開發板/開發板管理員,輸入esp32,把esp32板子安裝起來。

板子使用ESP32 Wrover Module,使用esp32板子要先安裝esptool,請自行安裝。參數設定如下圖()


燒錄範例檔:開啟範例檔CameraWebServer。

要修改的部分如下:

第17行#define CAMERA_MODEL_ESP_EYE // Has PSRAM,註解掉(加//)。

 //#define CAMERA_MODEL_ESP_EYE // Has PSRAM

第24行//#define CAMERA_MODEL_AI_THINKER // Has PSRAM把註解(//)拿掉

#define CAMERA_MODEL_AI_THINKER // Has PSRAM

第38 39 行,改成你要連線AP的SSID和密碼:

const char* ssid = "AP的SSID";
const char* password = "AP的密碼";

編譯檔案有無問題,無問題後燒錄(燒錄前要把jump插入IO0和GND,很重要、很重要、很重要按下燒錄後,要先按著reset鈕,看到Connecting.........後放開reset鈕。


燒錄完成,移除jump,打開serial monitor,按下reset鈕就會看到板子連上ap後的ip,在瀏覽器中輸入ip就可以看到畫面了。


320x240時可以把臉部辨功能打開。


腳位圖


2023年5月31日

sonarqube原碼檢測安裝記事

 參考文章:https://hackmd.io/@spyua/SkA2AwdBF

linux下環境設置

vm.max_count:流程可以擁有的VMA(虛擬內存區域)的數量
fs.file-max:系統所有程序一共可以開啟的檔案數量
ulinit:設置shell啟動進程所占用的資源

sudo sysctl -w vm.max_map_count=262144
sudo sysctl -w fs.file-max=65536
ulimit -n 65536
ulimit -u 4096 


安裝openjdk-11-jdk

windows download jdk-17(不能用jdk-20)

https://www.oracle.com/tw/java/technologies/downloads/#jdk17-windows

 java -version

安裝和設置資料庫PostgreSQL

sudo apt install postgresql postgresql-contrib
sudo service postgresql start
sudo service postgresql status
sudo passwd postgres

windows install PostgreSQL

https://www.postgresql.org/download/windows/

sudo service postgresql status,用於檢查您資料庫的狀態。
sudo service postgresql start,用來開始執行您的資料庫。
sudo service postgresql stop,用來停止執行您的資料庫。

su - postgres
createuser sonar
psql
ALTER USER sonar WITH ENCRYPTED password 'sonar';
CREATE DATABASE sonarqube OWNER sonar;
grant all privileges on DATABASE sonarqube to sonar;
\q
exit

 下載完解壓縮


config資料夾下
sonar.properties修改處

sonar.jdbc.username=sonar
sonar.jdbc.password=sonar
sonar.jdbc.url=jdbc:postgresql://localhost:5432/sonarqube

sonar.sh修改處
RUN_AS_USER=sonar

sudo vim /etc/security/limits.conf
增加 
sonarqube   -   nofile   131072
sonarqube - nproc 8192
啟動
./sonar.sh start


中文化
擴充套件中輸入關鍵字chinese,裝起來
直接下載.jar也可以。

檢測cli文章

修改conf/project.properties
增加入容
#檔案編碼
sonar.sourceEncoding=UTF-8
#專案目錄
sonar.projectBaseDir=/home/teacher/file_dir
#程式碼位置
sonar.sources=.
sonar.cobol.copy.directories=/copy
#登入帳密
sonar.login= admin
sonar.password= password
#專案key
sonar.projectKey=projectkey

執行檢測

./bin/sonar-scanner