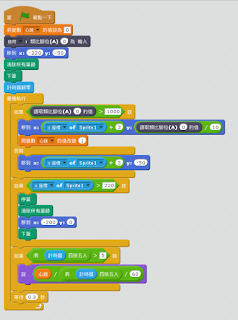
曾經想過用麥克風來收心跳,但雜音太多,沒有成功。看到有人賣手指心跳偵測器,買一個來試試。
它的原理是利用紅外線反射原理, 感測手指脈搏次數,試了很久,因為到底是用類比還是數位針腳呢?在scratch2下,個人測試要用類比來做會比較好。
個人的scratch積木:
sb2檔案
2015年12月30日
2015年12月21日
dns壓力測試
參考文章:http://note.tc.edu.tw/837.html
確定nds版本
named -v
wget https://ftp.isc.org/isc/bind9/9.10.3/bind-9.10.3.tar.gz
tar zxvf bind-9.10.3.tar.gz
cd bind-9.10.3/contrib/queryperf/
sh configure
make
複製執行檔到/usr/sbin
cp queryperf /usr/sbin/
如果和我使用的是edu2015的版本可以直接下載我編譯好的檔案來使用。
下載後記得做
chmod +x queryperf
cp queryperf /usr/sbin/
執行方式
先建立查詢txt檔,建議至少100行可以是MX A ...
例如:
www.turku.fi A
www.helsinki.fi A
執行指令:
queryperf -d input_file -s server
結果:
Queries per second: 1137.599665 qps
代表每秒可以執行多少查詢
群輝異地備援
今天又看到宣導勒索病毒防治。上次分享群輝nas異地備援,不少人有興趣,所以記錄一下,或許有人需要。
1.要有兩台群輝nas
2.在備份目的開好分享資料夾(這個大家應該沒問題)
3.安裝備份套件(這個也不會有問題)
4.在備份目的的nas做以下動作:開啟服務
5.在備分來源端開啟back time套件,新增一個任務。
1.要有兩台群輝nas
2.在備份目的開好分享資料夾(這個大家應該沒問題)
3.安裝備份套件(這個也不會有問題)
4.在備份目的的nas做以下動作:開啟服務
5.在備分來源端開啟back time套件,新增一個任務。
2015年12月13日
壓力偵測FSR402心得
近日使用壓力偵測感應器,記錄一下。
它是一個電阻式的設備,在不同作用力進入時它的電阻值會改變。
重要的是雖然它只有2個接線,接入arduino時記得要放一個10K的電阻在5V和data腳位中,不然值會亂跳。
它可偵測範圍100克至10公斤
值0-1023
進一步資料可以參考:http://thats-worth.blogspot.tw/2014/07/fsr-force-sensing-resistor.html
其他是maker部分,如何歸零,如何讓殘存壓力除去....細部問題。需要去細細處理。
使用壓力計啟動繼電器範例:
http://opensource.ntpc.edu.tw/moodle/pluginfile.php/45095/mod_folder/content/0/%E5%A3%93%E5%8A%9B%E8%81%96%E8%AA%9501.abp?forcedownload=1
2015年12月7日
抹除硬碟資料
行政電腦下架,大家需要抹除硬碟資料工具,查了一下,linux也有好用的工具可以抹除資料
1.dd用法dd if=/dev/zero of=dev/sdx
這個方法還有一還是有被專業人士還原的風險。
2.shred用法sudo shred -vfz -n 10 /dev/sdX
# -v 顯示進度。 # -f 強制寫入,必要時允許變更權限寫入。
# -z 用零覆寫並撕碎。 # -n 指定覆寫次數。
我把指令加入clonezilla live裡這樣就不用拆硬碟了。一樣放在ftp裡
修改的clonezilla live zip檔
ftp://163.20.108.1/images/clonezilla-L4630G-ntpc-works-auto-recover.zip
參考網址:
http://ithelp.ithome.com.tw/question/10138612
2015年12月2日
行政電腦USB隨身碟自動還原
使用clonezilla live技術,感謝國家高速網路中心開發好工具。
1.準備一只1GB以上的隨身碟
2.下載zip
3.把隨身碟格式化成FAT32
4.解壓縮zip檔到隨身碟
5.建立開機程式
(1)edu2015:使用檔案總管進入隨身碟的/utils/linux資料夾,按下滑鼠右鍵/開啟終端機
sudo -s
bash makeboot.sh /dev/sdb1
說明:/dev/sdb1是設備名稱,請先確認。
(2)windows:使用檔案總管進入隨身碟的/utils/win32或是win64資料夾(依電腦作業系統選擇),找到makeboot.bat,按下滑鼠右鍵/以系統管理員身份執行。
過程中按按幾次y。
這樣這支隨身碟在新北市網段內(網路要通),使用它開機,可以選擇要還原C碟或是還原全部硬碟。還原時要按兩次Y做確認。
如果要還原廠商給的最原始的版本,請修改syslinux資料夾下的syslinux.cfg和isolinux.cfg中,找到L4630G-ntpc-works01-img改為L4630G-ntpc-works-img,這個是廠商給的最原始版本。
2015年12月1日
水溫感測器arduino
它要用兩個函數需下載到/usr/share/arduino/libraries/
OneWire.h的下載點:
http://playground.arduino.cc/Learning/OneWire
http://www.pjrc.com/teensy/arduino_libraries/OneWire.zip
DallasTemperature.h的下載點
https://github.com/milesburton/Arduino-Temperature-Control-Library
下載後解壓縮至 /usr/share/arduino/libraries 資料夾中
我修改
http://www.motoduino.com/products-english/?layout=edit&id=53
網站做法,使用數位腳位3,加上了如果溫度高於28度,會作動作(蜂鳴器響),每隔1秒偵測一次
開啟arduino ide
貼上下列內容
#include <OneWire.h>
#include <DallasTemperature.h>
// Data wire is plugged into port 2 on the Arduino
#define ONE_WIRE_BUS 3
// Setup a oneWire instance to communicate with any OneWire devices (not just Maxim/Dallas temperature ICs)
OneWire oneWire(ONE_WIRE_BUS);
// Pass our oneWire reference to Dallas Temperature.
DallasTemperature sensors(&oneWire);
void setup(void)
{
// start serial port
Serial.begin(9600);
Serial.println("Dallas Temperature IC Control Library Demo");
pinMode( 11 , OUTPUT);
// Start up the library
sensors.begin();
}
void loop(void)
{
// call sensors.requestTemperatures() to issue a global temperature
// request to all devices on the bus
Serial.print("Requesting temperatures...");
sensors.requestTemperatures(); // Send the command to get temperatures
Serial.println("DONE");
Serial.print("Temperature for the device 1 (index 0) is: ");
Serial.println(sensors.getTempCByIndex(0));
if (( ( (sensors.getTempCByIndex(0)) ) > ( 28 ) ))
{ //digitalWrite( 11 , HIGH );
tone(9, 250);
}else{
noTone(9) ;// digitalWrite( 11 , LOW );
}
delay(1000);
}
訂閱:
文章 (Atom)


